Automations Library: build an automation once, reuse it everywhere
Updated
Audience: Admins and implementation teams Applies to: OnRamp Automations Library (Library → Automations)
What is the Automations Library?
The Automations Library is the single place to build, store, and reuse automations across your OnRamp workspace. Instead of rebuilding the same logic inside each playbook or project, you create an automation once in the library and then apply it wherever it's needed — one playbook, a handful of in-flight projects, or many at once.
An automation is deliberately simple: a trigger and an action.
Trigger — the event that starts it (for example, when a task is completed).
Action — what OnRamp does in response (for example, update a field in Salesforce).
When the trigger fires, OnRamp runs the action automatically.
Where to find it
In the left navigation, open Library.
Select the Automations tab.
The Automations list shows every automation your team has built, with columns for:
Column | What it shows |
|---|---|
Name | The automation's name |
Trigger | The event that starts it (for example, When project created) |
Actions | What it does (for example, Update Salesforce field) |
Used in | Where the automation is currently applied |
Last modified | When it last changed |
Created by | Who created it |
Use the Active / Archived toggle to switch between live and retired automations, and the Search, Trigger, and Actions filters to narrow the list.
Create an automation
On the Automations tab, select + New Automation.
In Details, give it a clear Name (and an optional Description). The name is how teammates will recognize it in the list, so make it descriptive — for example, Update CRM Close Date.
1. Set the trigger
Under the workflow, choose when the automation should run. Trigger options include events such as:
When project created
When project updated
When project owner or status changes
When project completion % reaches a threshold
When project completed
When module completed
When a module is added
When an internal note is made
When task completed (or When any task completed)
When a subtask completed
When a specific Playbook datafield changes
When any Playbook datafield changes
For a task-based trigger, select Select a task to open the task picker. You can search tasks and filter them by where they come from: All, Playbook, Project or Library. The picker opens on Playbook. Choose a specific playbook in place of Any playbook so only that playbook's tasks show, and then pick the exact task that should kick the automation off.
2. Choose the action
Next, choose what happens. Action types include:
Update Salesforce field
Upload Files to Salesforce Object
Update Hubspot field
Update a data field
Add a module (available when it's turned on for your organization)
Call webhook
Send all task answers
Change task data
3. Configure the action (example: Update Salesforce field)
Using Update Salesforce field as the example:
Object to update — pick the Salesforce object, for example, Opportunity.
Field to use as reference — choose the field OnRamp uses to match the record (for example, Name).
Map fields to update — add one or more rows. For each row set Update this field (the Salesforce field) and With this data (the OnRamp project value to write into it). This is how you write OnRamp data back into your CRM — for example, writing a project's start date into the opportunity's close date.
4. Save
Select Save. It's available once the automation has a name and a complete trigger and action. After you save, you go back to the Automations list, where you see an Automation created successfully confirmation and the new automation, ready to reuse. If the CRM mapping needs attention, you see a warning instead.
Apply an automation in bulk
Once an automation exists in the library, apply it to many destinations at once:
On the automation's row, open the ⋮ (more) menu and choose Apply to…. This option appears only for active automations. Archived automations don't show it.
In the Apply automation dialog, switch between the Playbooks, Projects, and Modules tabs depending on where you want it to go. Switching tabs clears your selection, so you apply to one type at a time.
Search and select the items you want, up to 100 destinations at once. The dialog doesn't stop you selecting more, but if you apply to more than 100, the whole request fails with an error and nothing is applied. Split larger batches into groups of 100 or fewer. Where available, filter projects by Status and Playbook to find the right set quickly. The dialog shows a running "N selected" count.
Select Apply.
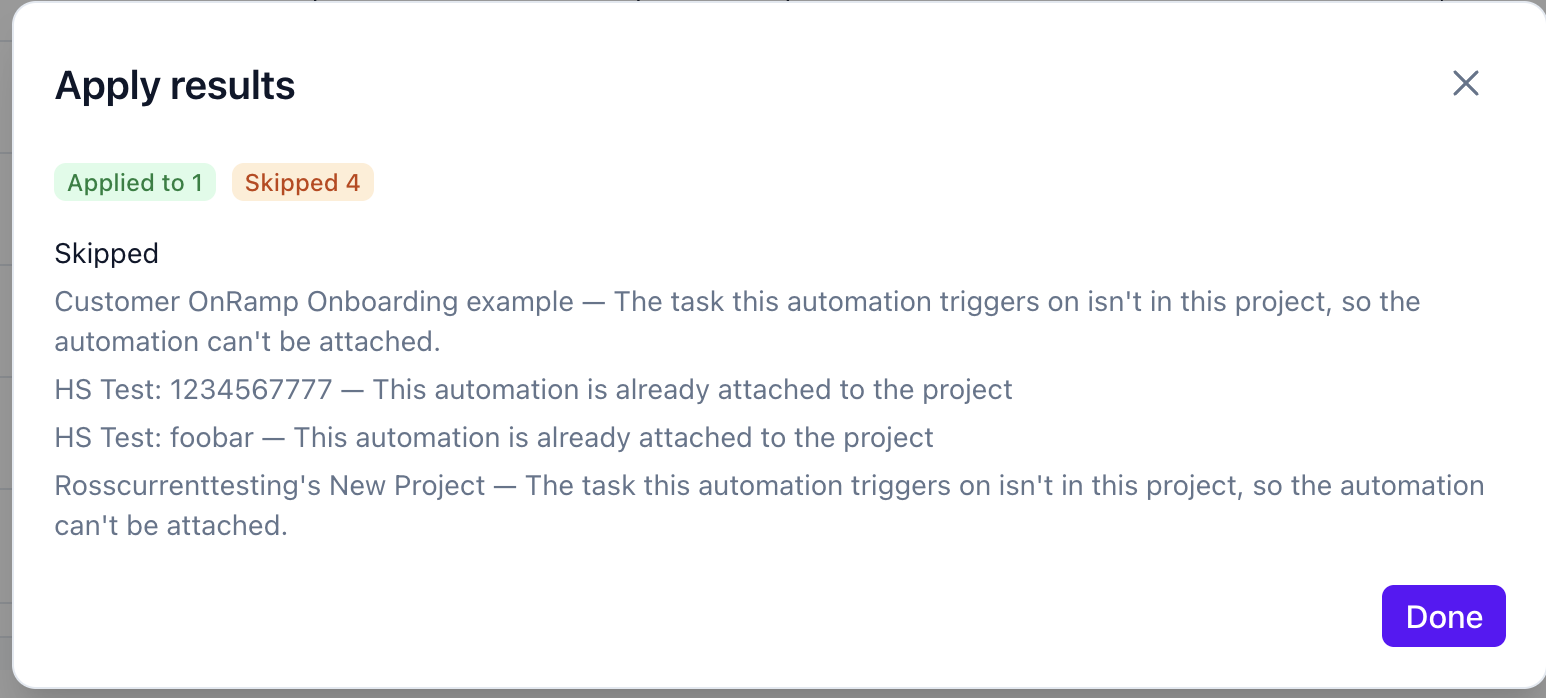
OnRamp shows an Apply results summary — how many it Applied to and how many were Skipped, with the reason for each skip (for example, "This automation is already attached to the playbook."). The automation is attached to the destinations counted under Applied to. Destinations listed under Skipped don't get it. Some destinations appear under Applied with warnings, with the warning shown beside each one.
Import an automation into a playbook, project, or module
You can also pull an automation in from the other direction. Super Admins, Creators and Integrators can do this on any playbook, project or module they can edit.
Open the Automations section of the playbook, project, or module.
Choose Import from library.
Search for and select the automation.
Select Next. In most cases this imports the automation right away.
If you're importing into a playbook or project and the automation's trigger is tied to a module or task, a second step opens. Select Import there. When you import into a module, there's no second step.
Import results shows the outcome. Select Done to close it.
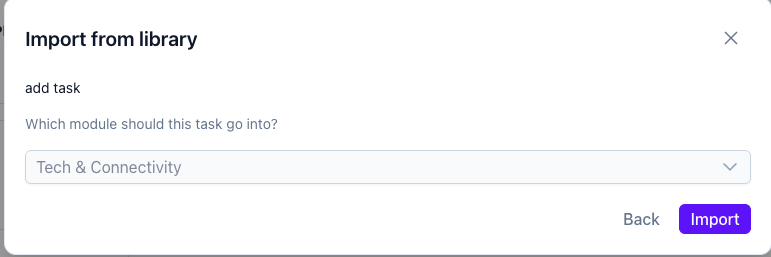
NOTE: When you import into a playbook or project, the second step depends on the trigger. If the automation's trigger is tied to a module, a message says that the module will be added too, along with the automations on its tasks and the module's own automations. If the trigger is tied to a task, you're asked Which module should this task go into? Pick an existing module or + Create a new module. If you create a new module, enter its name in New module name. Then select Import.
Tips
Name automations descriptively. The Name and Trigger/Actions columns are how teammates find the right one, so avoid generic names.
Build once, apply broadly. Prefer creating a single library automation and applying it in bulk over rebuilding the same logic in each playbook.
Check "Used in". After applying, the Used in column shows how many places an automation is attached to, as a number. It doesn't list which ones.
Read the skip reasons. In Apply results, Skipped can mean the automation is already attached to that destination. It can also mean the destination doesn't have the task or module the trigger uses, or that a When project created automation was aimed at an active project. Read the reason shown for each skip.
Archive automations you no longer need. Open the ⋮ menu on the automation's row and select Archive. To bring it back, select Unarchive. The Active / Archived toggle switches which list you see.
The big idea
Build your automations in one place — the Automations Library — and propagate them across OnRamp wherever they're needed: playbooks, projects, and modules.